chen-er 专为Chen式ER图打造的npm包
前言
现代 Web 的各种图形库基本上都默认存在 ER 图 渲染,尤其是 Mermaid 这种“文本到图形”更是不例外,但遗憾的是,这些图形库完全都是按照 Crow’s Foot 方法
Crow’s Foot 方法(也称 “乌鸦脚表示法”)是一种用于数据库设计的实体 - 关系 (ER) 图可视化表示方法,以其表示 “多” 关系的独特三分支符号(类似鸟爪)得名。它是数据库设计中最流行的 ER 表示法之一,广泛应用于软件工程、信息工程和数据库建模领域。
来写的,但学校是按照 Chen’s Notation,也就是经典的 菱形关系、椭圆属性、矩形实体
Chen 表示法(也称 “陈式 ER 表示法”)是由华裔计算机科学家陈品山(Peter Pin-Shan Chen) 于 1976 年在《ACM Transactions on Database Systems》发表的《The Entity-Relationship Model—Toward a Unified View of Data》中首次提出的实体 - 关系(ER)模型可视化规范,是原始 ER 模型的官方表示法,也是数据库建模、软件工程教学中最经典的 ER 可视化范式。
个人来讲,ER 图 表示法是我在学校的数据库课中学来的。为了方便自己快速从文本绘制 ER 图(就像 Mermaid 那样)而不是通过第三方工具手动拖拽拼凑那样繁琐麻烦
那么作为计算机学生,发现网上缺少这样的实现,不免心痒,于是就诞生了下面的 npm 包
chen-er
github/chen-er: https://github.com/xingwangzhe/chen-er/
npm/chen-er: https://www.npmjs.com/package/chen-er
在线体验!!!: https://codesandbox.io/p/sandbox/m248ws
chen-er 是基于 Peggy 和 ECharts 开发的、从文本转到 ER 图 的 npm 包,其中,Peggy 用来将文本进行解析/序列化,ECharts 用来实现图形渲染与自动布局
技术细节
为什么选择 Peggy
这点要感谢 AI 的推荐,这个库看起来没什么人用,但我敢说这绝对是宝藏:它对语法的解析绝对比自己手撸正则要好很多!!!
我们可以自定义**“宏”**,来方便复用一些常用的方法
// Peggy 语法通用规则库
_ // 可选空白 + 注释 = (comment / [ \t\n\r])*
__ // 至少一个空白字符 = [ \t\n\r]+
// 行内空白(不含换行)hws = [ \t]*
// 跨平台换行符newline = "\r\n" / "\n" / "\r"
// 标识符(支持 Unicode 字母和数字)Identifier = id:$[^ \t\n\r{}():\"#\-]+ &{ return /^[\p{L}_][\p{L}\p{N}_]*$/u.test(id); } { return id; }
// 行注释(不吞掉换行)comment = "#" [^\n\r]* { return null; }接下来我们可以定义实体与关系。显然,只要我们学过 C++ 或 Java 这种 OOP 范式的编程语言,自然知道应该如何定义它,一个简单的格式就定好了
entity Customer { customer_id PK # 主键下划线用PK标记 name email phone}接下来就开始定义了,当你看到下面的 Peggy 代码,你会发现,这个定义非常符合编程直觉;即使你从未学过编译原理或者正则表达, 也能看懂很多!这正是 Peggy 的魅力所在!!!
// 引用公共规则import { Identifier, hws, newline, _ , __, comment } from "./common.peggy"
// start // 解析入口// = _ entities:entity+ _ { return entities; }
// 注释在 common.peggy 中
entity // 解析实体定义(允许前置空白) = _ "entity" __ name:Identifier _ "{" _ fields:fieldBlock _ "}" { return { type: "entity", name: name, fields: fields }; }
// 字段块:零到多行字段,每行以换行结束fieldBlock = fieldLine*
fieldLine // 解析多行字段定义(行首至少一个空白,避免空匹配;行尾可注释) = hws f:field hws comment? hws newline { return f; }
field // 解析字段定义(行内不吞换行) = name:Identifier hws pk:("PK")? { return { type: "field", name, pk: pk !== null }; }类似的对于关系,我们可以这么定义
rel Customer -- Order (1:n) "places" # 客户下订单rel Customer -- Address (m:n) "uses" # 客户使用地址rel Order -- Address (1:1) "shipped to" # 订单发货地址相应的代码实现
// 引用公共规则import { Identifier, hws, newline, _ , __, comment } from "./common.peggy"
// start // 解析入口// = _ rels:rel+ _ { return rels; }
// 关系定义:rel <实体1> -- <实体2> : (基数) "<关系名>"rel = _ "rel" __ left:Identifier __ "--" __ right:Identifier _ ":" _ "(" card:Cardinality ")" _ name:QuotedString _ comment? newline? { return { type: "relation", left, right, cardinality: card, name }; }
// 基数:如 1:n, m:n, 1:1Cardinality = chars:[^)]* { return chars.join("").trim(); }
// 双引号字符串QuotedString = '"' chars:[^"]* '"' { return chars.join(""); }这两个重点写好了,那么汇总一下
// 引用公共规则import { _ } from "./common.peggy"
// 引用实体规则import { entity } from "./entities.peggy"
// 引用关系规则import { rel } from "./sample.peggy"
start // 解析入口:支持实体和关系混合定义 = _ elements:(entity / rel)+ _ { return elements; }至此,语法解析的部分基本结束。同时,这些 Peggy 编译后输出的 JS 代码会自动输出序列化的数据,接下来将在 ECharts 中使用。
ECharts 渲染
首先简单定义一下类型
/** * 字段定义 */export interface ERField { type: "field"; name: string; pk: boolean;}
/** * 实体定义 */export interface EREntity { type: "entity"; name: string; fields: ERField[];}
/** * 关系定义 */export interface ERRelation { type: "relation"; left: string; right: string; cardinality: string; name: string;}
/** * ER 图 JSON 节点类型 */export type ERJson = EREntity | ERRelation;“桥接”点,方便引入 Peggy 编译产生的 JS 解析器和序列化功能
// @ts-ignore 使用 peggy 生成的解析器(ESM,命名导出 parse)// 生成脚本见 package.json -> scripts.pgimport { parse as peggyParse } from "../grammar/peggy/all-parser.js";import type { ERJson } from "./type";
/** * 解析 ER 图文本为 AST * @param input 多行 ER 图定义文本 * @returns 解析后的 AST 数组 */export function parseERSchema(input: string): ERJson[] { try { return peggyParse(input) as ERJson[]; } catch (e: any) { console.error("解析失败:", e?.message, "\n位置:", e?.location); throw e; }}
/** * 解析 ER 图文本并输出 JSON * @param input 多行 ER 图定义文本 * @returns JSON 字符串 */export function parseERSchemaToJSON(input: string): string { return JSON.stringify(parseERSchema(input), null, 2);}为了方便叙述,下面代码改成高度概括的版本
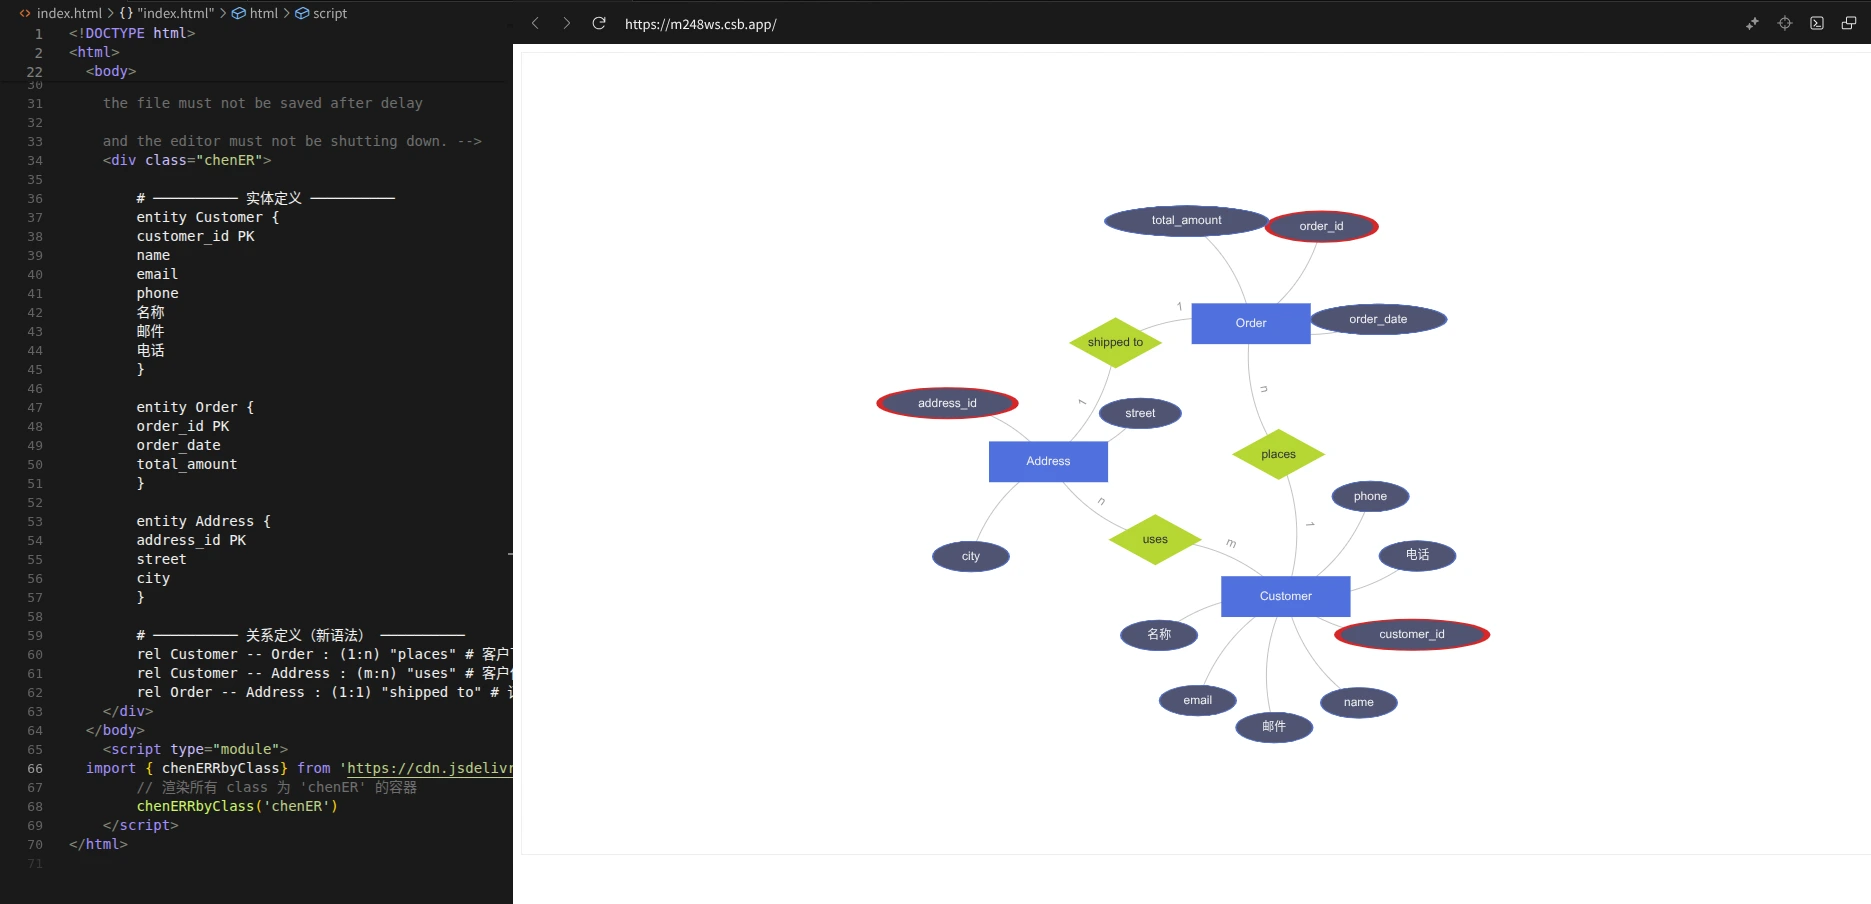
仅保留三个关键步骤——解析(parseERSchema)→ 映射(实体/属性/关系三类节点与连边)→ 渲染(ECharts Graph + 力导向布局)。形状遵循 Chen 表示法:实体=矩形,属性=椭圆(主键红色描边),关系=菱形;基数标注到边标签上。通过 chenERRbyClass/chenERRbyId 即可把容器内的 ER 文本 直接渲染为可交互图。
import * as echarts from "echarts/core";import { GraphChart } from "echarts/charts";import { TooltipComponent } from "echarts/components";import { CanvasRenderer } from "echarts/renderers";import type { ComposeOption } from "echarts/core";import type { GraphSeriesOption } from "echarts/charts";import { parseERSchema } from "./main";
// 仅注册必需组件(图 + 提示 + 渲染器)echarts.use([GraphChart, TooltipComponent, CanvasRenderer]);type ECOption = ComposeOption<GraphSeriesOption>;
// 椭圆属性节点(Chen)const ELLIPSE = "path://M50 0 A50 50 0 1 1 49.999 0 Z";
// AST -> Graph(节点、连边)function astToGraph(ast: any[]) { const nodes: any[] = []; const edges: any[] = []; for (const it of ast) { if (it.type === "entity") { const id = it.name; nodes.push({ id, name: id, symbol: "rect", category: "entity", symbolSize: [Math.max(140, id.length * 14 + 40), 48], label: { show: true }, attrs: (it.fields || []).map((f: any) => ({ name: f.name, pk: !!f.pk })), }); for (const f of it.fields || []) { const aid = `${id}.${f.name}`; nodes.push({ id: aid, name: f.name, symbol: ELLIPSE, symbolKeepAspect: false, symbolSize: [Math.max(90, f.name.length * 16), 36], category: "attribute", label: { show: true }, itemStyle: { borderColor: f.pk ? "#d62728" : "#5470c6", borderWidth: f.pk ? 3 : 1, }, }); edges.push({ source: aid, target: id }); } } else if (it.type === "relation") { const rid = `rel:${it.name}-${it.left}-${it.right}`; const [l = "", r = ""] = (it.cardinality || "").split(":"); nodes.push({ id: rid, name: it.name, symbol: "diamond", symbolSize: [110, 60], category: "relation", label: { show: true }, }); edges.push({ source: rid, target: it.left, name: l }); edges.push({ source: rid, target: it.right, name: r }); } } return { nodes, edges };}
// 批量渲染指定类名容器export function renderChenER(cls = "chenER") { const list = document.getElementsByClassName(cls) as HTMLCollectionOf<HTMLElement>; for (let i = 0; i < list.length; i++) { const el = list[i]; const { nodes, edges } = astToGraph(parseERSchema(el.textContent || "")); el.innerHTML = ""; const chart = echarts.init(el); const option: ECOption = { series: [ { type: "graph", layout: "force", roam: true, data: nodes, links: edges, categories: [{ name: "entity" }, { name: "relation" }, { name: "attribute" }], label: { show: true, position: "inside" }, edgeLabel: { show: true, formatter: (p: any) => p?.data?.name ?? "" }, edgeSymbol: ["none", "none"], lineStyle: { color: "#888", curveness: 0.2 }, force: { repulsion: 600, edgeLength: 140, friction: 0.2 }, tooltip: { show: true, formatter: (p: any) => { if (p.dataType === "node" && p?.data?.category === "relation") { return p.data.name || ""; } if (p.dataType === "node" && p?.data?.category === "entity") { const d = p.data as any; const attrs = (d.attrs || []).map((a: any) => a.pk ? `*${a.name}` : a.name, ); return [d.name, ...attrs].join("<br/>"); } return p.name || ""; }, }, }, ], }; chart.setOption(option); addEventListener("resize", () => chart.resize()); }}
export const chenERRbyClass = renderChenER;export function chenERRbyId(id: string) { const el = document.getElementById(id) as HTMLElement | null; if (!el) throw new Error(`Container #${id} not found`); el.classList.add("chenER"); renderChenER("chenER");}还等什么,现在就去试试吧!
https://codesandbox.io/p/sandbox/m248ws
chen-er 专为Chen式ER图打造的npm包
作者:xingwangzhe
本文链接: https://xingwangzhe.fun/posts/b8eb3b61/
本文采用 知识共享署名-非商业性使用-相同方式共享 4.0 国际许可协议 进行许可。
留言评论